Author: Adam Nunn

Why It’s Important to Inspect Your Dock Regularly

dock repair

Dock Repair adds value to your property and keeps your family safe. Regular inspections of your dock are vital for identifying issues like splintering wood, wobbly decking, and rust on metal parts of the pier.

Managing dock maintenance using scheduling data can prevent downtime by predicting problems before they occur. This includes restoring surfaces, checking connections and inspecting dock framing/posts.

dock repair

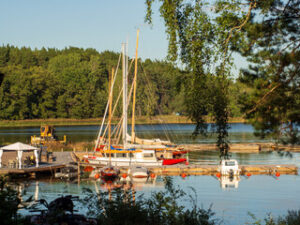
When docks are used as a boating and swimming platform, they’re subjected to a lot of pressure from boats and water currents. Over time, this can cause damage that makes the structure dangerous to use. If you notice any signs of structural damage, it’s important to hire dock repair as soon as possible.

One of the most common issues that docks face is wood rot. This is caused by a fungus that affects the wood and causes it to break down over time. If left untreated, rotting wood can destroy the entire dock, so it’s vital to inspect your dock regularly for signs of rot and call in a professional as soon as possible.

Other common structural issues include cracking and warping. These problems can be caused by a variety of factors including water, stress, and even weather changes. If the cracking is on a non-load bearing support material, then it may be able to be repaired fairly easily, but if the cracks are on load-bearing supports, then they’ll need to be replaced.

Docks are also vulnerable to damage from saltwater and its effects on metal. This includes corrosion and rust, which can significantly reduce the lifespan of your dock. It’s important to inspect your dock regularly for corrosion and rust, and replace any sections that are damaged or have rusted through.

Loose boards are another problem that needs to be fixed right away. These can fall into the water and be hit by a passing boat or swimmer, potentially causing serious injury. If you’re concerned about the condition of your dock’s boards, it’s a good idea to replace them with new treated wood that will resist rot and fungal decay better than older wood.

It’s also a good idea to replace any metal hardware on your dock that’s showing signs of wear and tear, as this can be extremely dangerous. Minor rust can often be repaired with a coat of paint, but widespread rust could mean that it’s time to consider a full replacement. When you’re looking for the best dock repair in , you can count on us to deliver the highest quality service at a competitive price.

Docks are built to withstand powerful waves and tides, but they aren’t indestructible. Even well-maintained, promptly repaired docks will eventually reach the end of their lifespan and need to be replaced. Inspecting a dock regularly and taking care of any damage right away will prolong its lifespan and help you save money on repairs. However, it’s important to know when a dock is past repair and needs a complete replacement.

One sign that your dock is reaching the end of its life is wide cracks. These cracks will cause the dock to shift and become unsafe. If you notice a wide crack in your dock, it’s time to invest in a new one.

Wooden docks often experience rotting and deterioration over the years due to the constant exposure to water. Wood and concrete don’t play well together, so if you’re seeing signs of rot or deterioration, it’s time to replace your dock.

Metal docks are also susceptible to rust and decay. They can be fixed with a little bit of work, but if the rust or deterioration is widespread, it’s likely time to invest in a new dock.

While it’s normal for some bending and warping to occur, these changes can be dangerous. It’s a good idea to inspect your dock for any bending or warping at the beginning of each season. It’s possible to fix warped boards by hammering them back into place or replacing them, but you might have to replace your entire dock if it has been severely damaged.

Foundation deterioration is always a bad sign and usually indicates that it’s time for a total dock replacement. This foundation is what supports the entire structure, so when it’s compromised, the whole dock could come tumbling down with just a slight nudge.

Creaking and wobbling are other signs that your dock may be nearing the end of its life. This is because the dock is trying to compensate for a loss of stability or support. If you’re noticing these symptoms, it’s best to contact a professional to take a look at your dock.

Even with regular cleaning, sanding and staining, wood that comes in contact with water is going to deteriorate over time. When this deterioration becomes severe, it can affect the structural integrity of the dock and endanger people who use it. The best way to avoid this is to catch problems early by regularly inspecting the dock and taking action as soon as possible when damage is observed.

One of the most common signs that your dock is in need of repair is cracking of the platform and/or the supports. This can occur as a result of pressure from waves, currents, or vessel collisions and is incredibly dangerous. If the cracks are on non-load-bearing support materials, they may be repaired fairly easily but if there is extensive structural cracking then a full replacement of the dock will need to be considered.

Similarly, if you notice any signs of rust, it’s important to get these taken care of immediately. Rust is caused by metals contacting water and can cause serious damage if not addressed right away. A small amount of rust can be cleaned with home remedies, but significant amounts could require a full replacement of the affected metal parts.

Another sign of deterioration that needs to be addressed right away is loud racket coming from your dock. This noise usually indicates that there is metal-on-metal contact, and this can be extremely dangerous for anyone using the dock.

Docks along inland waterways are constantly exposed to extreme pressure from waves, currents, and vessels. This constant pressure can wreak havoc on the structures and leave them in need of immediate repair. The most common damage to these types of structures is rusting, cracks in the foundation, and rotting of the dock platform and/or supports.

If you notice any of these issues, it’s important to contact a professional right away to arrange for inspection and repairs. By catching these problems early, you can protect the integrity of your dock and the safety of everyone who uses it.

Many docks are built near bodies of water, which expose them to rain, wind and waves. Over time, these conditions can cause damage and deterioration. Keeping up with regular maintenance and repairs can help prevent costly problems down the line.

Like other structures, your dock may need to be inspected by a professional. An inspection costs $50 to $100 and is a great way to catch minor issues before they turn into major problems. The inspector will check the dock pilings, railings, decks and boat lifts for signs of damage or other issues. They will also look for safety hazards, such as broken electrical cables.

Docks are vulnerable to severe weather, such as hurricanes, that can cause flood and collapse. A storm surge can submerge a stationary dock and wash away railings, boards, and other parts of the structure. The resulting debris can damage the hulls of moored boats or fall onto other property below.

If a dock has been damaged, it can take weeks for a contractor to get to the site and begin construction. The cost to repair the dock and remove the debris can add up quickly. This can leave homeowners with a large bill, especially when the dock was destroyed by a hurricane.

While most home insurance policies exclude coverage for docks, some do include limited protection. Homeowners who have purchased Additional Living Expense (ALE) coverage may be covered for the cost to repair or replace a dock. This coverage is typically limited to 2%, 5%, or 10% of the homeowner’s policy’s building value.

A well-maintained dock can add value to a home, so it is important to inspect and maintain the structure regularly. It is also important to conduct routine maintenance before severe weather hits, such as a hurricane. A good rule of thumb is that a dock should be inspected and repaired once every year or as needed.

If your dock is damaged, contact a licensed insurance agent who specializes in writing coastal homeowners’ policies to review your coverage. If your dock is not protected by an ALE policy, it can be endorsed to include coverage under your homeowner’s insurance for a fee, although that will increase your premium.

What You Need For a Successful Bathroom Tile Installation

Bathroom Tile Installation

A successful bathroom tile installation depends on good planning and precise measurements. Tile installers Jacksonville FL are also essential. Mark a chalk line down the center of a wall or ceiling to establish the starting point for your tiles. Use a bubble level to make the line straight and aligned with other markings on the surface.Bathroom Tile Installation

A great-looking tile job starts with a well-planned layout. Even the best-made tiles won’t hide a bad layout, and a poorly laid wall can look sloppy and uneven. A qualified tile installer can carefully plan a layout so that grout lines are straight and level, and that any trimmed portions of tiles won’t show on prominent areas of the walls.

Layout is especially important for wall tile projects. Unlike floors, which are laid in a random pattern, walls are typically tiled one row at a time in a vertical direction. This creates an opportunity for an untrained installer to get a bad result by not planning ahead for the need to trim tiles in corners, near doorways and fixtures, and at wall/ceiling joints.

To help prevent this from happening, it’s a good idea to do a dry-fit before adhering any tiles. This will let you see how the finished wall will look and make adjustments if necessary. It also helps you to figure out how many whole tiles there will be in each quadrant, so that you can plan for any awkwardly-cut tiles and avoid having too many small cuts showing on the top, bottom or sides of your finished wall.

Tip: For smaller jobs, you can use a piece of graph paper to do a scale drawing (make sure 1/4 in. gridline = 1 foot). This will give you a good visual reference for working out your layout, including cut tile locations and decorative tile placement.

Some professional designers suggest tiling the floor before laying any walls, in order to ensure that the finished wall will seem to “hang” over the floor. Others disagree, pointing out that doing so can lead to moisture problems in the floor and shower.

When you’re choosing bathroom tile, there are many different looks and materials to choose from. You’ll need to find tiles that look good, but are also able to handle the demands of your bathroom (like water, shampoo, soap, etc).

First, consider how much you want to spend. Tile comes in a range of prices, and the amount you need will depend on the size of your space. You may be able to get away with smaller tiles in areas where the tile will not be noticed, but larger tiles can make your space feel larger and more open.

Next, consider color and texture. The right tile will match the look and style of your bathroom. Consider what kind of color and pattern you want, and keep in mind that you can mix up the sizes, shapes, and colors of your tiles to create a unique look. For example, you could use large tiles on the floors with smaller ones on the walls, or you could combine busy patterns with classic shapes and solid color tiles.

Finally, consider how your bathroom tile will look in the light. Light is constantly changing, and the way a tile will look in your room can change drastically depending on what time of day it is and what type of lighting you have. This is why it’s always a good idea to take home a sample of your tile selection and see how it will look in your space before making a final decision.

When you’re ready to start installing your tiles, start by measuring your bathroom wall-to-wall to figure out how much tile, grout and underlayment to buy. You should also plan on purchasing a few extra tiles to cover any cutting or measurement mistakes.

When you install tile, you need the proper adhesives to keep it in place. Some types of tile adhesives come pre-mixed and ready to use, while others are available as powder that you mix yourself. The type of tile adhesive you choose mainly depends on the situation; whether the area is exposed to moisture or movement, and what type of tiles are being installed (e.g. – ceramic, porcelain or natural stone).

There are two major types of adhesives you can use for your tile installation project; latex-modified thinset mortar adhesives and mastic adhesives. Both are ideal for laying man-made, ceramic or porcelain tiles, but the one you choose depends on what type of tile you’re installing and whether it’s being used in an indoor or outdoor setting.

Mastic is often the preferred tile adhesive for installations using subway tiles and other small, rectangular tiles that require a fast bond. It also works well for securing textured, “brick” and other rustic-style tiles. Mastic also dries much faster than thinset, meaning you can work more quickly with this product.

If you’re installing larger tiles or working outdoors, a latex-modified thinset mortar is the ideal choice. These types of tile adhesives are stronger and more flexible than mastic, and they can be used with different substrates such as plywood or concrete. They’re a good fit for tiling on new or existing surfaces and are highly durable when properly applied and cured. The Weber-tylon range of standard set and high-strength rapid-setting adhesives includes a wide variety of solutions for different installation situations. Those requiring extra strength and flexibility should consider the BenferFlex Standard Set +S1 25kg Extra White tiling adhesive which is specially formulated to offer extended workability.

Sealants help to protect your tile and grout from dirt, spills and general wear. They make the tiles easier to clean and prolong the life of the installation. There are two main types of sealants: a penetrating sealant and a surface coating. Penetrating sealants soak into the pores of your tile and form a protective shield, and they can also be tinted to enhance or darken your tile or stone. Surface coatings sit on top of the tile and can be glossy, matte, or satin. Both types of sealants can offer stain protection, but the type of protection you choose depends on your needs and the color of the tile or stone.

Regardless of which type of sealant you use, it’s important to follow the manufacturer’s instructions for application and drying time. Most sealants need to be wiped down with a damp sponge or cloth and allowed to dry completely before being exposed to water. Before you seal the tile, remove any mold or mildew growth and any stains that might be present with a cleaner.

Caulking is a common part of any bathroom tile installation. A good, even bead of caulk helps to seal the gap between your tile and the tub, shower, or wall. Caulking is usually made of latex, silicone, or a combination of both.

While many people think that their tile installation will last forever, the truth is that it’ll need to be resealed at some point. Most tile sealants last a few years, and some penetrating sealers can go up to a decade before they need to be reapplied. Resealing your tile installation is an inexpensive way to extend its lifespan and keep it looking great.

A tile installation project is difficult to complete without a variety of specialized tools. These include a tile cutter for cutting the tiles, a hand trowel for mixing and cleaning up squeeze out from grout lines, a sponge to clean up and work tile adhesive, a notch trowel for spreading your thin-set, a spacer tool for spacing your wall or floor evenly, and a chalk line that helps you align your tile patterns.

You may also want to purchase some additional tools such as a squeegee to remove excess water from your tile, and a ladder for reaching high spaces on the ceiling or walls. A ladder with a handrail will make it easier to get up and down from the work area. Finally, you should consider purchasing a heavy-duty plastic underlayment to lay over the substrate before applying your backer board or cement.

Depending on the type of tile you are installing, there are a few types of underlayments that you can use. A plywood board is one of the most common underlayments, and it works well for floors and ceilings. It is often used in combination with a backer board, which is a thick plastic layer that adds strength to the floor and prevents the tiles from slipping or cracking.

A notch trowel is an essential tool for spreading your tile adhesive, and it can be purchased with notches at different angles. This ensures that your adhesive is spread evenly across the floor or wall. A margin trowel is a smaller version of the notch trowel that is great for working small areas and tight spaces.

A good quality manual tile cutter is the best way to cut your tile. Look for a tile cutter that has several settings, so that you can cut a range of sizes of tiles. There are also nippers that look like pliers for cutting curved or irregular tiles, and they work by clipping away thin strips of the edges. These nippers usually have one flat jaw that holds the glazed surface of the tile flush with it, and another jaw with a curved cutting edge that bites into the unglazed surface.


The Work Environment For HVAC Technicians

HVAC Services

If you’re considering a career in the HVAC industry, you should learn all you can about the job, including its duties, salary, and specializations. It’s also helpful to consider the work environment in which you’ll interact with clients.

HVAC ServicesMost HVAC jobs are full-time, though some may have to work irregular hours in peak seasons. These positions require extensive training and a strong level of technical knowledge. HVAC technicians at https://hubbardmechanical.com/ specialize in one type of system or particular types of repair or maintenance.

With the growth of the HVAC industry, wages have become an important factor in attracting and keeping good workers. A fair salary can make you more satisfied with your job and even boost your productivity. Whether you’re just starting out or you’ve been in the business for years, there are ways to ensure you get paid what you’re worth. The Bureau of Labor Statistics provides information on the average salaries of various positions. Some states pay more than others, so it’s always a good idea to do your homework.

Depending on your skills and experience, your HVAC tech salary can range from $21,500 to more than $100,500. Several factors affect these numbers, including education, the cost of living, and state-by-state data. In terms of base salaries, Washington, California, and New Jersey are the top paying states. Hawaii and Alaska are also high-paying states. In general, entry-level technicians can earn more with a good degree and some experience. Technicians who have an undergraduate degree in HVAC typically earn 32% more than those who do not.

Whether you want to become a technician or a manager, a career in HVAC can provide you with a wide variety of business opportunities. You can specialize in commercial refrigeration, radiant heating, or industrial refrigeration. But whatever your specialty, you must know that working in this field can be demanding and often involves extreme weather and working at night.

A typical technician’s job includes installation, maintenance, and troubleshooting of various equipment and systems. Technicians work under extreme conditions and are often exposed to hazardous materials. However, if you’re well-trained and equipped with the right skills, you can take on challenging tasks.

Many technicians begin their careers with vocational school, apprenticeship, or an associate’s degree. Some choose to pursue a bachelor’s degree. The job requires a high level of attention to detail, as well as the ability to read blueprints, handle hazardous chemicals, and adjust systems. An apprenticeship is a type of training program offered by trade unions or associations. It takes three to five years to complete, but can qualify you for a nationally recognized certification.

Having a properly functioning HVAC system is a good way to save money and help the environment. It can also improve the quality of life for residents. However, there are many different kinds of HVAC systems. Therefore, you’ll need to know each type’s ins and outs.

Depending on the company you work for, your job may involve installing and servicing heating and cooling equipment. You’ll also be required to work with different types of air quality systems.

Most of your job will be indoors, but you’ll need to travel to locations around the area. You’ll be working in a variety of settings, including residential and commercial projects. Some of your tasks will be outdoors in inclement weather, or in contaminated spaces.

Several HVAC companies offer on-the-job training programs. These programs can be up to ten months long. The job also requires a lot of hard work and long hours. If you want to be a successful HVAC technician, you should have a degree or an apprenticeship. This will help you learn the technical skills necessary to perform a range of duties.

The work environment for HVAC technicians is diverse. They can work in residential, industrial, or commercial settings. Their duties include installing, maintaining, and repairing air conditioning, heating, and refrigeration systems.

HVAC technicians must be able to work under pressure. They often experience a high degree of physical activity, including walking, lifting, and carrying heavy items. Also, they are subject to dangerous weather and extreme temperatures.

An HVAC technician’s skills are in high demand worldwide. A growing demand for energy efficiency and installing more efficient systems has helped boost the number of jobs available. There are also opportunities for advancement. Typically, entry-level HVAC technicians receive pay raises as they gain more experience. This may happen through an apprenticeship, a formal technical training program, or through a degree program.