
A successful bathroom tile installation depends on good planning and precise measurements. Tile installers Jacksonville FL are also essential. Mark a chalk line down the center of a wall or ceiling to establish the starting point for your tiles. Use a bubble level to make the line straight and aligned with other markings on the surface.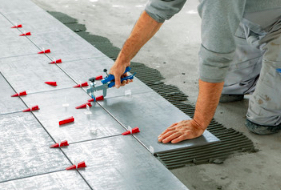
A great-looking tile job starts with a well-planned layout. Even the best-made tiles won’t hide a bad layout, and a poorly laid wall can look sloppy and uneven. A qualified tile installer can carefully plan a layout so that grout lines are straight and level, and that any trimmed portions of tiles won’t show on prominent areas of the walls.
Layout is especially important for wall tile projects. Unlike floors, which are laid in a random pattern, walls are typically tiled one row at a time in a vertical direction. This creates an opportunity for an untrained installer to get a bad result by not planning ahead for the need to trim tiles in corners, near doorways and fixtures, and at wall/ceiling joints.
To help prevent this from happening, it’s a good idea to do a dry-fit before adhering any tiles. This will let you see how the finished wall will look and make adjustments if necessary. It also helps you to figure out how many whole tiles there will be in each quadrant, so that you can plan for any awkwardly-cut tiles and avoid having too many small cuts showing on the top, bottom or sides of your finished wall.
Tip: For smaller jobs, you can use a piece of graph paper to do a scale drawing (make sure 1/4 in. gridline = 1 foot). This will give you a good visual reference for working out your layout, including cut tile locations and decorative tile placement.
Some professional designers suggest tiling the floor before laying any walls, in order to ensure that the finished wall will seem to “hang” over the floor. Others disagree, pointing out that doing so can lead to moisture problems in the floor and shower.
When you’re choosing bathroom tile, there are many different looks and materials to choose from. You’ll need to find tiles that look good, but are also able to handle the demands of your bathroom (like water, shampoo, soap, etc).
First, consider how much you want to spend. Tile comes in a range of prices, and the amount you need will depend on the size of your space. You may be able to get away with smaller tiles in areas where the tile will not be noticed, but larger tiles can make your space feel larger and more open.
Next, consider color and texture. The right tile will match the look and style of your bathroom. Consider what kind of color and pattern you want, and keep in mind that you can mix up the sizes, shapes, and colors of your tiles to create a unique look. For example, you could use large tiles on the floors with smaller ones on the walls, or you could combine busy patterns with classic shapes and solid color tiles.
Finally, consider how your bathroom tile will look in the light. Light is constantly changing, and the way a tile will look in your room can change drastically depending on what time of day it is and what type of lighting you have. This is why it’s always a good idea to take home a sample of your tile selection and see how it will look in your space before making a final decision.
When you’re ready to start installing your tiles, start by measuring your bathroom wall-to-wall to figure out how much tile, grout and underlayment to buy. You should also plan on purchasing a few extra tiles to cover any cutting or measurement mistakes.
When you install tile, you need the proper adhesives to keep it in place. Some types of tile adhesives come pre-mixed and ready to use, while others are available as powder that you mix yourself. The type of tile adhesive you choose mainly depends on the situation; whether the area is exposed to moisture or movement, and what type of tiles are being installed (e.g. – ceramic, porcelain or natural stone).
There are two major types of adhesives you can use for your tile installation project; latex-modified thinset mortar adhesives and mastic adhesives. Both are ideal for laying man-made, ceramic or porcelain tiles, but the one you choose depends on what type of tile you’re installing and whether it’s being used in an indoor or outdoor setting.
Mastic is often the preferred tile adhesive for installations using subway tiles and other small, rectangular tiles that require a fast bond. It also works well for securing textured, “brick” and other rustic-style tiles. Mastic also dries much faster than thinset, meaning you can work more quickly with this product.
If you’re installing larger tiles or working outdoors, a latex-modified thinset mortar is the ideal choice. These types of tile adhesives are stronger and more flexible than mastic, and they can be used with different substrates such as plywood or concrete. They’re a good fit for tiling on new or existing surfaces and are highly durable when properly applied and cured. The Weber-tylon range of standard set and high-strength rapid-setting adhesives includes a wide variety of solutions for different installation situations. Those requiring extra strength and flexibility should consider the BenferFlex Standard Set +S1 25kg Extra White tiling adhesive which is specially formulated to offer extended workability.
Sealants help to protect your tile and grout from dirt, spills and general wear. They make the tiles easier to clean and prolong the life of the installation. There are two main types of sealants: a penetrating sealant and a surface coating. Penetrating sealants soak into the pores of your tile and form a protective shield, and they can also be tinted to enhance or darken your tile or stone. Surface coatings sit on top of the tile and can be glossy, matte, or satin. Both types of sealants can offer stain protection, but the type of protection you choose depends on your needs and the color of the tile or stone.
Regardless of which type of sealant you use, it’s important to follow the manufacturer’s instructions for application and drying time. Most sealants need to be wiped down with a damp sponge or cloth and allowed to dry completely before being exposed to water. Before you seal the tile, remove any mold or mildew growth and any stains that might be present with a cleaner.
Caulking is a common part of any bathroom tile installation. A good, even bead of caulk helps to seal the gap between your tile and the tub, shower, or wall. Caulking is usually made of latex, silicone, or a combination of both.
While many people think that their tile installation will last forever, the truth is that it’ll need to be resealed at some point. Most tile sealants last a few years, and some penetrating sealers can go up to a decade before they need to be reapplied. Resealing your tile installation is an inexpensive way to extend its lifespan and keep it looking great.
A tile installation project is difficult to complete without a variety of specialized tools. These include a tile cutter for cutting the tiles, a hand trowel for mixing and cleaning up squeeze out from grout lines, a sponge to clean up and work tile adhesive, a notch trowel for spreading your thin-set, a spacer tool for spacing your wall or floor evenly, and a chalk line that helps you align your tile patterns.
You may also want to purchase some additional tools such as a squeegee to remove excess water from your tile, and a ladder for reaching high spaces on the ceiling or walls. A ladder with a handrail will make it easier to get up and down from the work area. Finally, you should consider purchasing a heavy-duty plastic underlayment to lay over the substrate before applying your backer board or cement.
Depending on the type of tile you are installing, there are a few types of underlayments that you can use. A plywood board is one of the most common underlayments, and it works well for floors and ceilings. It is often used in combination with a backer board, which is a thick plastic layer that adds strength to the floor and prevents the tiles from slipping or cracking.
A notch trowel is an essential tool for spreading your tile adhesive, and it can be purchased with notches at different angles. This ensures that your adhesive is spread evenly across the floor or wall. A margin trowel is a smaller version of the notch trowel that is great for working small areas and tight spaces.
A good quality manual tile cutter is the best way to cut your tile. Look for a tile cutter that has several settings, so that you can cut a range of sizes of tiles. There are also nippers that look like pliers for cutting curved or irregular tiles, and they work by clipping away thin strips of the edges. These nippers usually have one flat jaw that holds the glazed surface of the tile flush with it, and another jaw with a curved cutting edge that bites into the unglazed surface.